This is a great pattern, that i have used for pike and bass in smaller sizes. you can get a big profile but a light fly to cast,
Place the hook in vise, here i am using a Sakuma 545 manta extra size 6/0. and tie in a bunch of orange bucktail, the thread is Danville 3/0.
Above i have trimmed the unwanted bucktail, plus added some orange flash.
Here i have tied in some yellow bucktail, in reverse tips pointing to eye of hook.note how i have built up thread to a cone, this will hold the bucktail back when pushed back to bend of hook.
Here i have tied in a light green, and pushed it back over the yellow. and also tied in an orange in reverse again.
Now i have tied in some green flash, if you want you can also cover the join with friz. but i don't see the need as it is covered,
In this photo, i am showing you how i push the bucktail back. it's easy using the outer cover of a ball point pen,
Here you can see, i have coned up the thread against the bucktail. and added fome more flash,
Now that i am coming close to the eye of the hook, i don't use as much bucktail. this will give you a better taper to the nose of the fly,
Now i have pushed back the first collar of green, and tied in another light collar in reverse.
Now above, i am pushing the last collar of bucktail near the eye of the hook.
Here i have tied in a small cone of thread, at the eye of hook. now at this point all the collars of bucktail, are all sticking out at right angles. so now we have to hold this tie under a hot water tap, the bucktail will the blend back in to shape of the hook. like magic hehehe.
Above i have tied in some dyed red jungle cock, for the eyes and used hot red to tie them in. note how you get a nice hollow light profile of a bait pattern,
Head on view, showing round profile.
And above two photos, showing different views. this is a tie you can make big or small, but it is very light to cast on a fly rod.
Hope you like the pattern,
Monday, 3 September 2012
Sunday, 2 September 2012
The Akroyd, Step by step.
This is a fly i love to tie and fish, its a very old pattern first tie in the 1700s, and its one that is still working well on the rivers, to me it just screams eat me. here i am using a Partridge HE Extra long shank blindeye hook, the DEE patterns look there best on the HE hook. this is a fishing fly, so no need to wrap the hook with plastic to save the jap black of the hook for show or framing.
Here i have tied in the dacron, and then below catch in the other side. this does lock in the thread well,
The hooks in the old days did not have eye on them, they did not have the machines. those days to turn out a hook with an eye, ( god i remember those days) so the made the eye for the hook out of gut. here i am using 30lb dacron works well.
Note that i have opened the braid, so that when you tie it down it tapers down to the hook.
Here you can see the taper, on the finished whipping. thread is Danville 140 denier white. and i coat this with thinned varnish to lock it onto shank of hook,
Now i change the thread to, Danville 70denier white. i use white a lot as you can hind the thread easier.
Here i have tied in the tag, it's long one on this pattern.
Here you can see tag tied off,
Here i have tied in the tail, of GP Crest and tippet over the Crest.
Now here i wax the thread, for the dubbing. and i have tied in the rib of oval silver tinsel.
Here i have dubbed on the yellow seals fur for rear body.
Above i have wound on the dubbing, and tied in the hackle to cover rear body.
Here i have run the yellow hackle back down the hook, and run back up the hook the oval tinsel to lock over the hackle.
Now we tie in the butt, which is ostrich herl black.
Here i have wound on the herl, and tied off and tied in the rib for forward body.
Here i have tied in the spey hackle black, and the floss for the forward body.
Here i have wrapped the floss and tied off.
Now i have wound on the spey hackle, and locked in place with the oval tinsel.
Now it's time to tie in the collar, here i am using Mallard flack natural.
Here the collar is wound, on and tied off.
Now we tie in the cheeks, Extra long jungle cock. and tied in underneath,
Now it's time to tie in the wing, first i have tied in the far side.
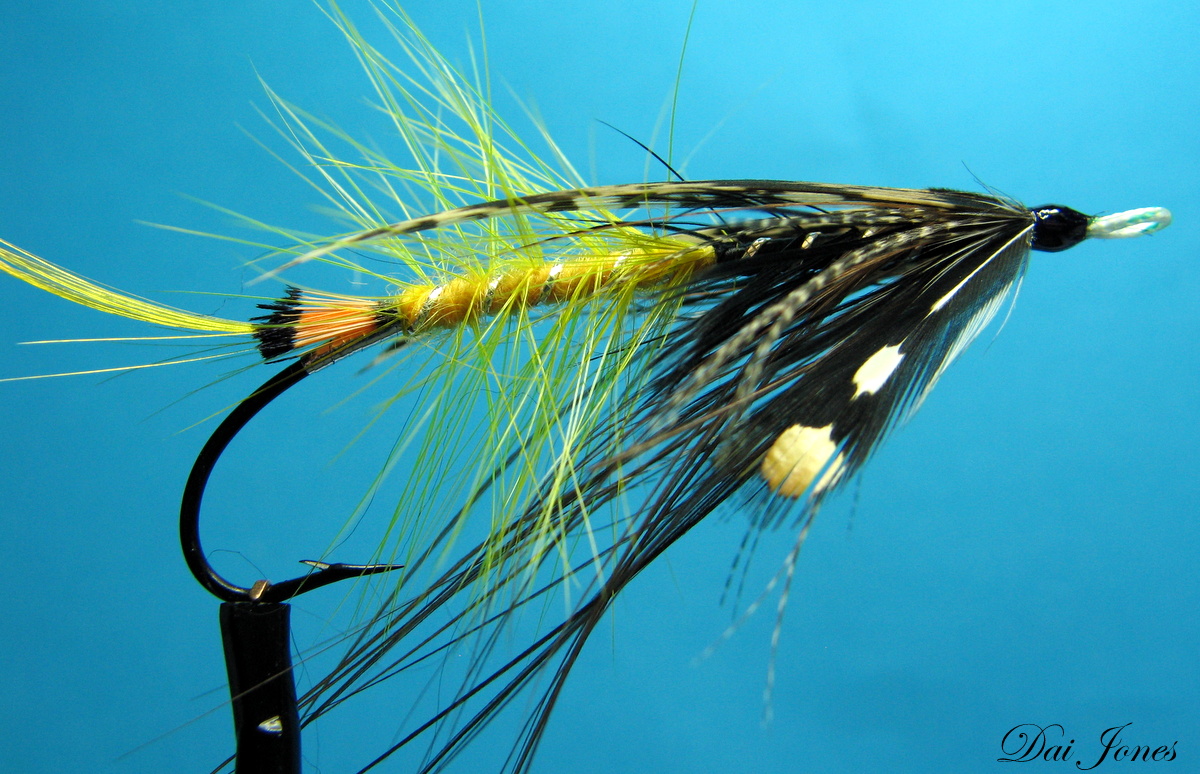
And full view of finished fly,
And a close up of fly.note how low the wing is laying,
And above, one of my boxes of the colors i use.sizes from 4/0 down to size 6.
Thursday, 30 August 2012
Bass rattle crease fly.
Here is a fly i have used a lot, for bass in my local estuary's. and also have worked for sewin, plus i have had salmon come up and have a go at them. and have fished them on a local beach, were a small river enters the beach. and have also had mackerel /shad take them,
We start off with a sheet of 2mm craft foam, this sheet has a glitter finish on one side.
What we are doing here, is marking out around the size of the hook.
Here you can see the markings of the hook. Here you can see the hooks that i am using, Sakuma 545 Manta extra nice strong hook.
Here i am showing the glitter finish, on the outer side. this gives the lure a bit more flash ,
Now place hook in vise, this is a old step by step, here i am using my old Dyna-king barracuda.and i have run the Danville thread white which is 140 denier.
Here i have tied in a tail, which is of bucktail and flash.
Now we take a few turns of thread, to hold on the rattle.
Here i have finished the tying on of rattle, and tied off the thread.Now cut out the shape needed to place foam on the hook, i tend to keep templates for other size hooks.
Here i place the foam over hook, and use super glue to hold in place. you only need to glue the lower part,
Showing here the underneath glued,
Now here i have used 5min epoxy, to coat the whole lure. these days i use Deer-creek UV rein,
Plus always put epoxy in the open end, this will seal up the rattle and fly.
The two photos above, show the lure coated with epoxy.
Now above showing the eyes, stuck on the epoxy finish.
This lure is a floating fly, and worked like a popper on the surface. and great fun when the fish come up to take the lure,
In the photos above, i am showing you that i have given another coat of epoxy. but have put on some more glitter of a silver colour, and leave to dry. the glitter over the top you will get in craft shops along with the foam,.
And here the finished fly, in red.
One in yellow,
In green,
And white,
All colours together, note the sparkel i have put on the lure it does stand out,
Subscribe to:
Posts (Atom)